Facebook is the best way to take your business to the next level. It is a great medium for your product’s advertisement. At present, most people prefer social media to promote their product and business. You have noticed that several ads are coming to social media account which attracts your attention at least for a while. First, you notice it and then go through it and maybe you buy that product if it is attractive. It means Facebook is the best way to grab the attention of customers.
But the question of how to promote and sell your product on Facebook. Let me tell you, you can do it very well with the help of the WooCommerce plugin. Yes, you heard right, such plugins help you to advertise your product in a stunning way. And hence the chances of getting more customers will increases.
Today, in this article I am going to tell you about the methods and steps with which you can sell your product on Facebook using the WooCommerce plugin.
 Now you're making the page with fill in the blanks of its information for your product.
 When you're finished making a Facebook product page, then you'll need a WooCommerce plugin for your page. Most importantly, to get the WooCommerce plugin, I personally suggest you go to this link & get your plugin. After taking your WooCommerce plugin it's time to upload, install & configure the plugin by following steps:
To installing the plugin go to the WordPress Admin-Dashboard, navigate to Plugins >> Add New.
When you're finished making a Facebook product page, then you'll need a WooCommerce plugin for your page. Most importantly, to get the WooCommerce plugin, I personally suggest you go to this link & get your plugin. After taking your WooCommerce plugin it's time to upload, install & configure the plugin by following steps:
To installing the plugin go to the WordPress Admin-Dashboard, navigate to Plugins >> Add New.
 Now, click the Upload’ link & Choose file “WooCommerce.zip”. Then, install & activate the plugin.
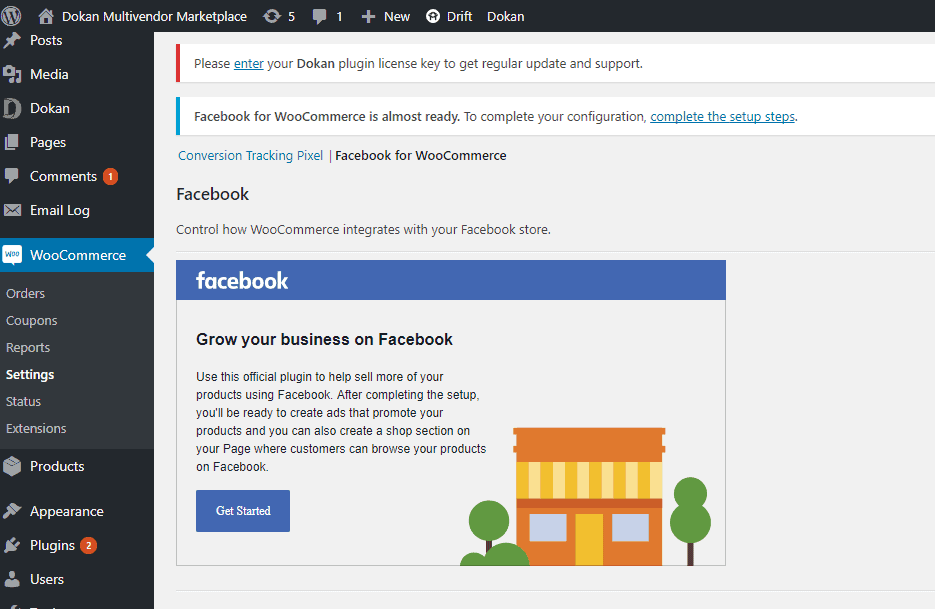
 In the left-hand menu click on the ‘WooCommerce’ tab, then on ‘Settings’ in the subsequent drop-down menu. Now provide the necessary info to the blanks box & click the button "Save Changes".
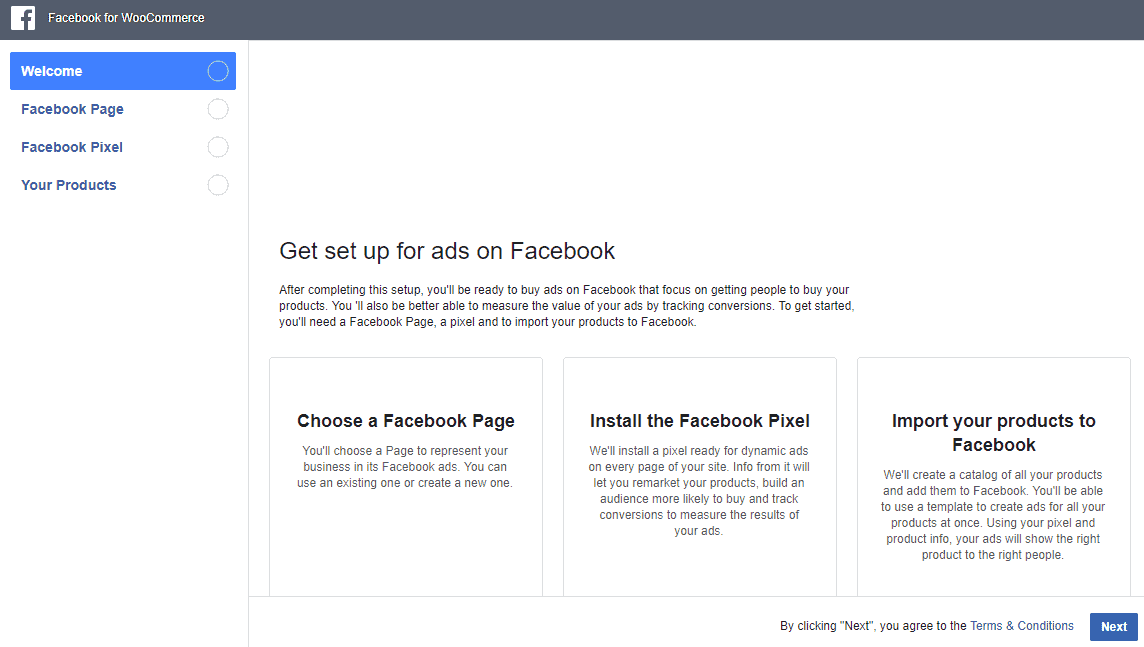
 The "Get Started" button will take you to your Facebook page.
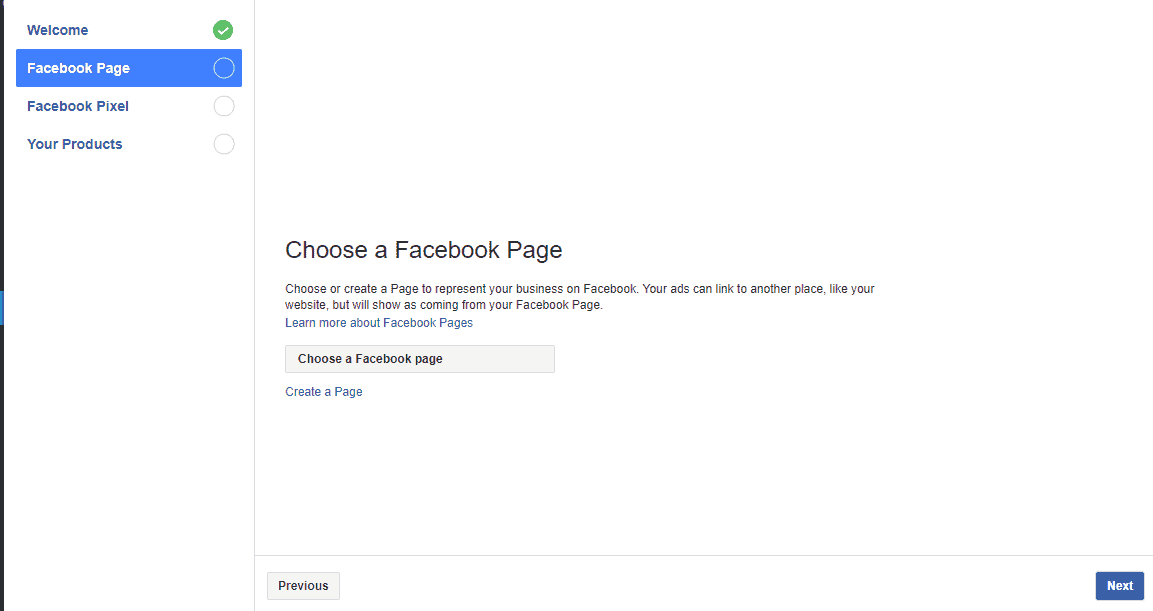
 Click on the "Choose a Facebook Page" option & select a page starting from the drop-down. After choosing your page, click on the following next button.
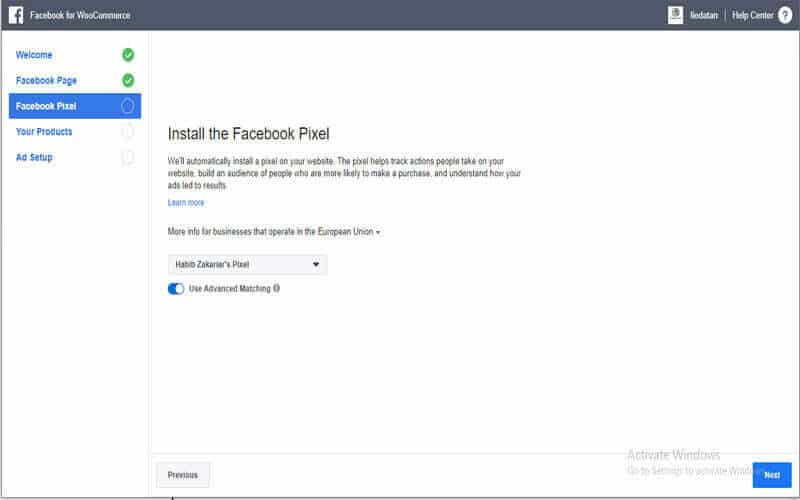
 Now, it'll take you to the Facebook pixel page. And you'll need to click the "Use Advanced Matching".
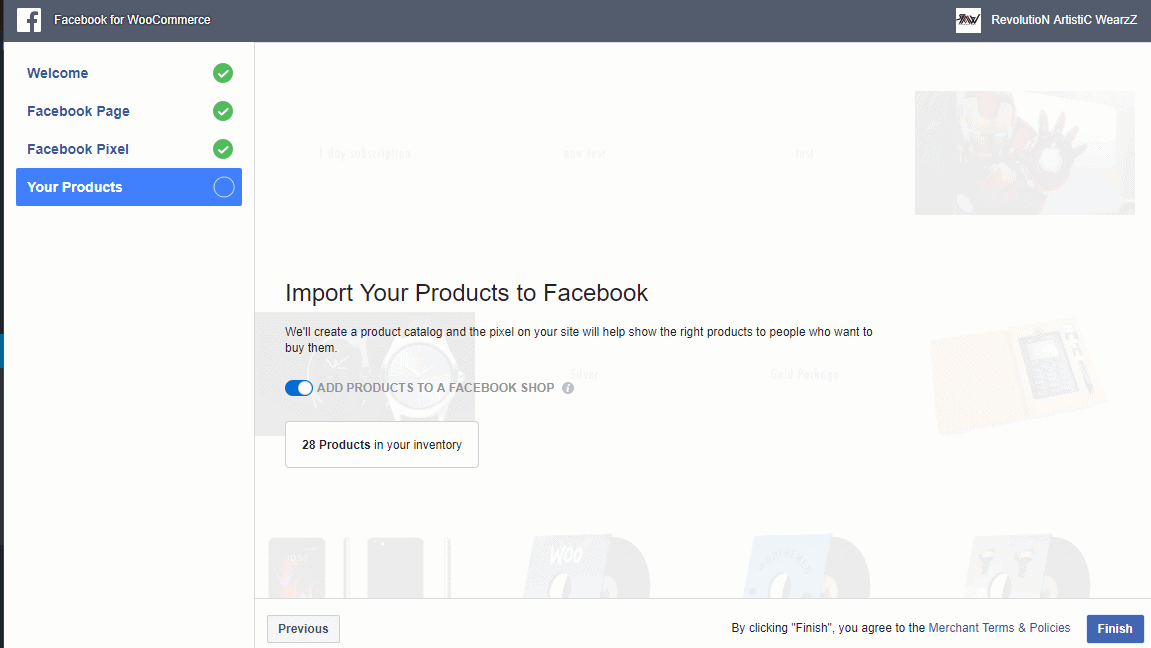
 Now it’s time to select the Facebook Pixel for tracking. For this you have to go through the following steps:
WooCommerce Plugin
WooCommerce is a plugin that you can integrate with your existing WordPress site very easily. It will help you create a fully functional WordPress e-commerce website with just a few clicks. WooCommerce is a Primary solution for users looking to launch their own stores online. With this plugin, you should never worry about losing control of your data as it provides you better security system. On the other hand, it has become the most favorite among the startups as well as enterprise-level businesses eCommerce stores. Now let’s go through step by step so that you can know how to sell your product on Facebook with the help of the WooCommerce plugin.Create Your Page for your Product
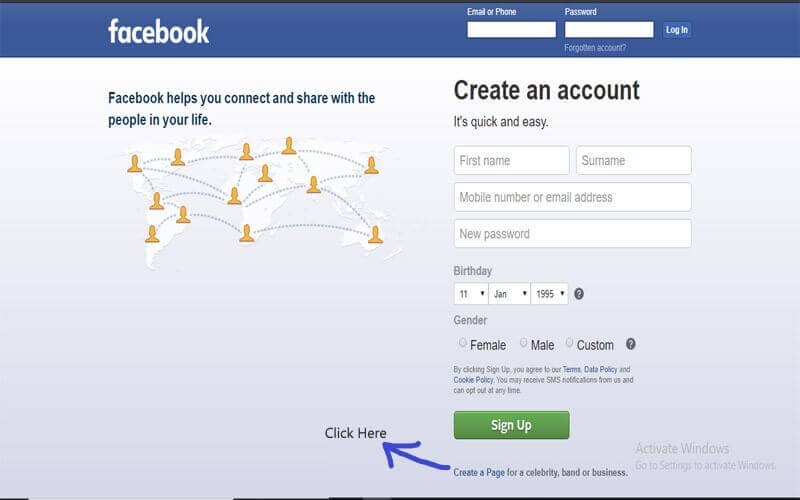
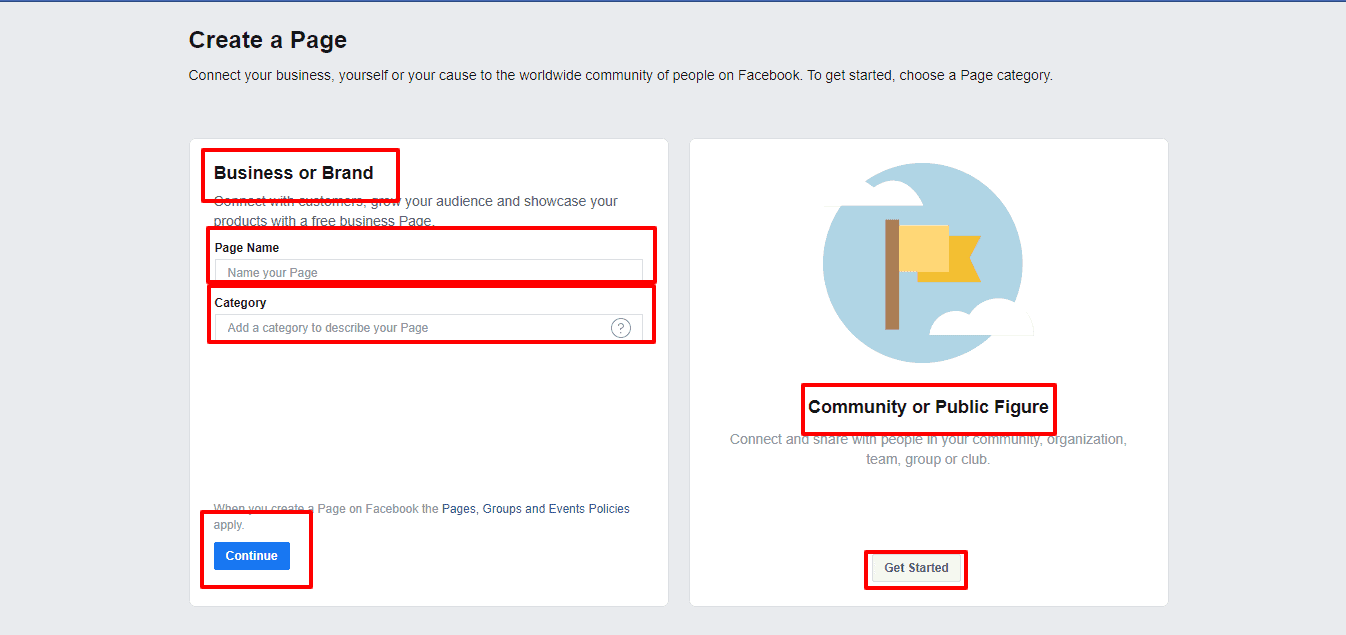
While making the page, you'll get different options for its design & format. You can pick the one you like or ignore if it's not required. To create a page, watch the following steps: To start, go to Facebook's main page & scroll for the bottom, there you'll find a link “Create a Page" & click it.
Now you're making the page with fill in the blanks of its information for your product.
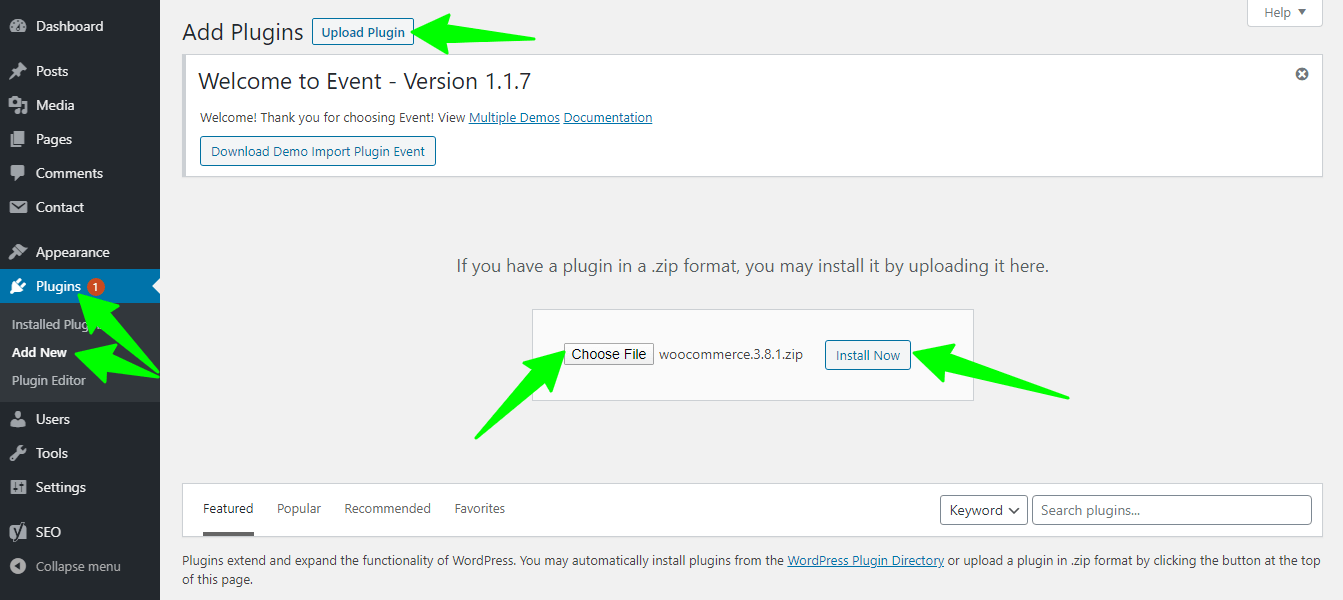
When you're finished making a Facebook product page, then you'll need a WooCommerce plugin for your page. Most importantly, to get the WooCommerce plugin, I personally suggest you go to this link & get your plugin. After taking your WooCommerce plugin it's time to upload, install & configure the plugin by following steps:
To installing the plugin go to the WordPress Admin-Dashboard, navigate to Plugins >> Add New.
Now, click the Upload’ link & Choose file “WooCommerce.zip”. Then, install & activate the plugin.
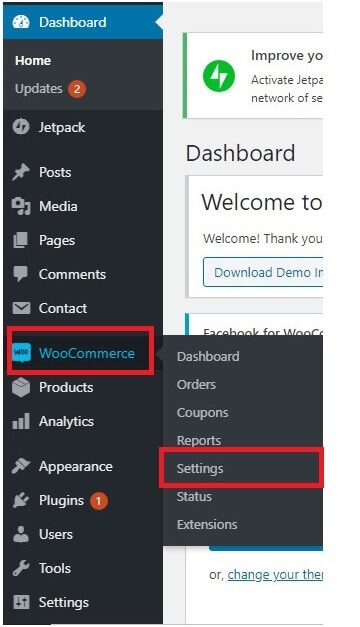
In the left-hand menu click on the ‘WooCommerce’ tab, then on ‘Settings’ in the subsequent drop-down menu. Now provide the necessary info to the blanks box & click the button "Save Changes".
Let’s integration:
For integration with Facebook for WooCommerce - go to, before we start you may get more information about pixels.- WP dashboard -> WooCommerce -> Settings
The "Get Started" button will take you to your Facebook page.
Click on the "Choose a Facebook Page" option & select a page starting from the drop-down. After choosing your page, click on the following next button.
Now, it'll take you to the Facebook pixel page. And you'll need to click the "Use Advanced Matching".
- Go to your Pixel tab in Events Manager.
- Click Create a Pixel.
- Read how the pixel works, then click Continue.
- Add your Pixel Name.
- Enter your website URL to check for easy setup options.
- Click Continue.
- It will track all the visitors on your site
- provide you with a system to target ads
- promote your products to the right people
- brings more traffic
Select eye-catching Images
I think you all know the importance of images, isn’t it? It has the ability to make things powerful and beautiful. A single image can take your product at a high level if it is attractive. At the same time, your product will be worthless, if your image is not eye-catching. SO you need to be very careful while selecting the images. And whenever it comes to your commercial product, you have to be double careful. You have to make sure; you are uploading a high quality of images that reflects the quality of your products. It helps you to attract more customers and make your page more responsive. If you are new to it or you are having any confusion about your product pictures, you can consult with professionals from a WooCommerce Development Company. You can also take opinions from the customers. It will help you to upload the best option.Start Selling from Your Page
Up to now, you have created your product’s page, selected its images and upload the product details. Now it’s the time when you have to start selling your product from its Facebook page. Before you start your selling, you have to declare the shopping features of your products. You can do it easily with the help of an e-commerce widget. After this, you need to get the WooCommerce-Facebook plugin form. There are several big and small companies which are offering such plugins at affordable price. So visit the company website and get the best one for your product. Important of such plugins- enable you to sync your products from Facebook store
- allow you to scan your product from WooCommerce websites
- any changes like addition or removal of products directly get reflected on your Facebook page
- provide multiple payment options to your customers
Comments